Install Ubuntu GUI*
*Graphical User Interface
- Setup droplet
- $ sudo apt-get update
For XFCE4 GUI (Preferred in my case)
- $ sudo apt install xfce4 xfce4-goodies
For Ubuntu Desktop GUID
- $ sudo apt-get install ubuntu-desktop
- $ sudo apt-get install ubuntu-gnome-desktop
- $ sudo apt-get install gnome-core
Finally….
- $ reboot
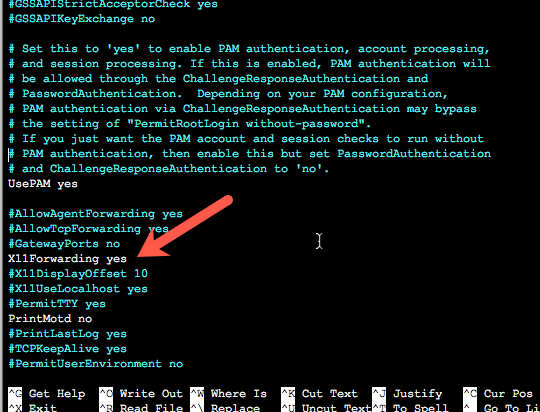
Enabling X11 Forwarding for GUI
$ sudo nano /etc/ssh/sshd_config
and make sure X11Forwarding yes is set
How to Install and Configure VNC Server on Ubuntu 19.04
Step 1: Install
sudo apt update
sudo apt -y install vnc4server
Step 2: Set a secure password
$ vncpasswd

// You will be prompted for a VNC password (needed to establish connection to your server later on)
Password:
Verify:
Step 3: Create a .XAuthority if it doesn’t exist
In order to start vncserver a .XAuthority file must exist at cd /home/$(whoami).
Otherwise you will get this error.
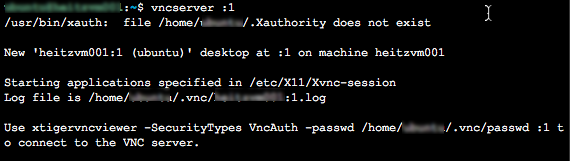
If the file is not created, create it as follow:
$ cd /home/$(whoami)
$ touch .Xauthority
Step 4: Setup VNC Startup commands
When we connect o VNC the commands inside xstartup file will be executed.
Warning: The config you put here will vary depending on your “Desktop Environment”.
In my case (and yours if you are following along since the beginning), you will be using the the ubuntu gnome.
Run
$ sudo vim ~/.vnc/xstartup
Then copy and paste the following
#!/bin/sh

export XKL_XMODMAP_DISABLE=1
unset SESSION_MANAGER
unset DBUS_SESSION_BUS_ADDRESS

[ -x /etc/vnc/xstartup ] && exec /etc/vnc/xstartup
[ -r $HOME/.Xresources ] && xrdb $HOME/.Xresources
xsetroot -solid grey
vncconfig -iconic &

gnome-panel &
gnome-session &
gnome-settings-daemon &
metacity &
nautilus &
gnome-terminal &
vnc4server requires us to install the following packages if we want it to display the desktop correctly
sudo apt-get install gnome-panel gnome-settings-daemon metacity nautilus gnome-terminal
At this moment, we are ready to start vnc server.
sudo vncserver :1

// A VNC/X11 server is already running as :1 on machine YOUR_MACHINE
:1 means screen #1
We can go further and specify screen options:
vncserver :1 -geometry 1280x1024 -depth 24
Step 5: Testing connection
Open a terminal and create a session with a tunnel between the server and our local machine on port 5901.
$ ssh my_user@my_server -C -L 5901:127.0.0.1:5901
Open your VNC Viewer client on your local machine.
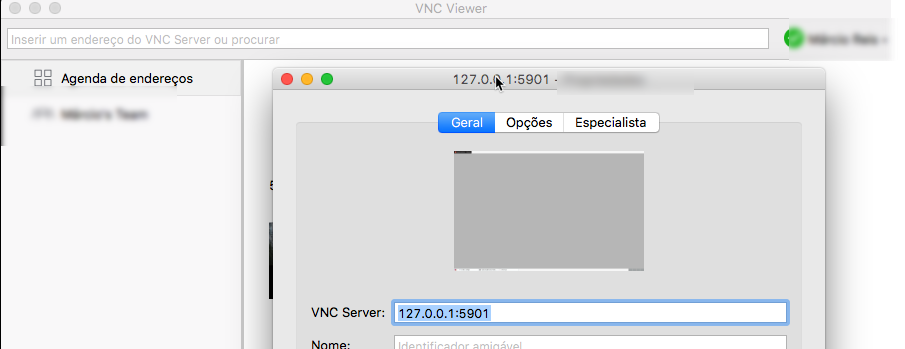
Enter your VNC Server password
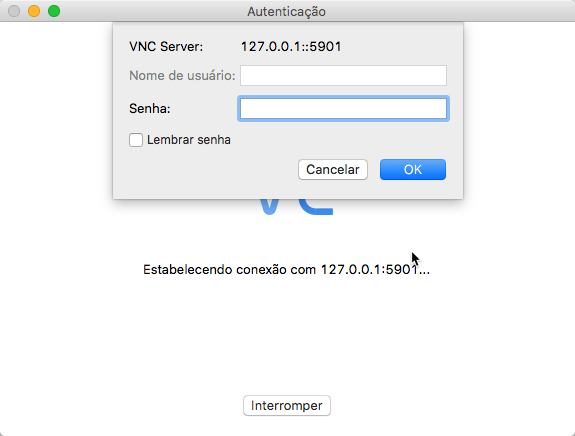
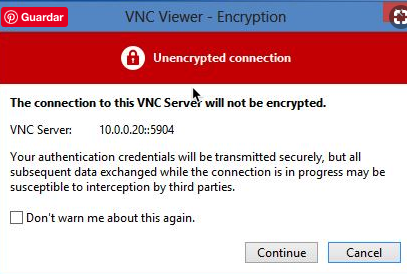
A warning will popup telling you that the connection to your VNC Server will be not encrypted.

How to do the same thing on Windows?
ssh is not available to you out of the box on windows cmd. You will have to download a tool called PuTTY to help you here.
Then, using putty, you must create your ssh tunnel.
And do exactly the same I did to connect to our VNCSever using VNCViewer (RealVNC)
Installing a better GUI
I was not very happy with the initial interface, for that reason I decided to install xfce.org. Here what I did.
sudo apt install xfce4 xfce4-goodies

mv ~/.vnc/xstartup ~/.vnc/xstartup.bak.gome_version
Then we create a new xstartup file by running
sudo nano ~/.vnc/xstartup
and adding the following content to it
#!/bin/bash
xrdb $HOME/.Xresources
startxfce4 &
Now we start VNC server
vncserver
And I create my ssh tunnel again
ssh user@server -C -L 5901:127.0.0.1:5901
Then, I connected to the server through VNC Viewer.
Normally everything should work just fine by If for some reason you come across the error below, here’s the fix.
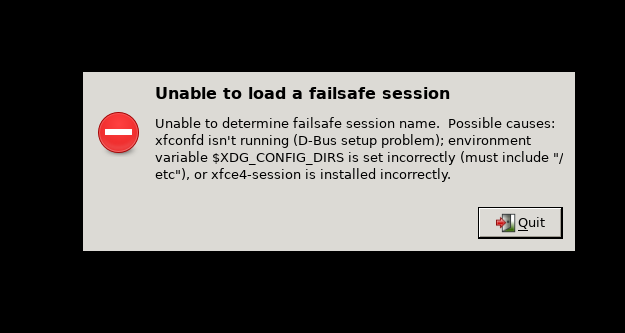
Run the following commands and reboot the server
mv ~/.config ~/.config-old
mv ~/.cache ~/.cache-old


sudo rebook
Then repeat the last two steps to see if the error is gone.
Creating a VNC Service File
sudo nano /etc/systemd/system/vncserver@.service
chown $(whoami) /etc/systemd/system/vncserver@.service
chmod 777 /etc/systemd/system/vncserver@.service
Then paste the following content but don’t forget to replace “ubuntu” by your own username.
[Unit]
 Description=Remote desktop service (VNC)
 After=syslog.target network.target

 [Service]
 Type=forking
 User=ubuntu
 PIDFile=/home/ubuntu/.vnc/%H:%i.pid
 ExecStartPre=-/usr/bin/vncserver -kill :%i > /dev/null 2>&1
 ExecStart=/usr/bin/vncserver -depth 24 -geometry 1280x800 :%i
 ExecStop=/usr/bin/vncserver -kill :%i

 [Install]
 WantedBy=multi-user.target
Then let’s make our systemctl aware of our service file by running the following commands
$ sudo systemctl daemon-reload
$ sudo systemctl enable --now vncserver@1

$ sudo systemctl restart vncserver@1
Installing a FTP Client
$ sudo apt-get install filezilla
Installing a FTP Server
sudo apt install -y vsftpd
If your firewall is enabled don’t forget to set the following rules:
sudo ufw allow 20/tcp
sudo ufw allow 21/tcp
sudo ufw allow 50000:55000/tcp

Then setup your vsftpd.conf file at /etc/vsftpd.conf
listen=YES
local_enable=YES
xferlog_enable=YES
connect_from_port_20=YES
pam_service_name=vsftpd

# Enable upload by local user.
write_enable=YES

# Enable read by anonymous user (without username and password).
secure_chroot_dir=/var/run/vsftpd/empty
anonymous_enable=YES
anon_root=/srv/ftp
allow_anon_ssl=YES
no_anon_password=YES


# CUSTOM CONFIGURATION


# Allow local logins without the use of ssl
force_local_logins_ssl=NO
force_local_data_ssl=NO

# Enable passive mode
pasv_enable=YES
pasv_max_port=55000
pasv_min_port=50000

# Optionally - Define which users are allowed to use the FTP
userlist_enable=YES
userlist_file=/etc/vsftpd.userlist
userlist_deny=NO
If you included the last 3 (optional) configuration lines, make sure to specify your allowed users in /etc/vsftpd.userlist. Mine has a single line with my ftp user.
Don’t forget to restart your FTP server
-- Stop
$ sudo systemctl stop vsftpd

-- Start again
$ sudo systemctl start vsftpd
If you have directories owned by root in your user’s home directory make sure to give your user’s the ownership, otherwise you won’t be able to write files into those directories
sudo chown -R $(whoami) /home/$(whoami)
TeamViewer
Removing all files from teamviewer:
https://community.teamviewer.com/t5/forums/forumtopicprintpage/board-id/Linux/message-id/2582/print-single-message/true/page/1
Update TimeZone
sudo dpkg-reconfigure tzdata
If tzadata is not installed you can install it by running
sudo apt-get update
sudo apt-get install tzdata
Alternative Pkg Managers
sudo apt-get install aptitude
or
sudo apt-get install gdebi

sudo apt-get install synaptic
apt install menu
su-to-root -X -c $app
XRDP
# allow just RDP through the local firewall

sudo ufw allow 3389/tcp

# restart xrdp
sudo /etc/init.d/xrdp restart
Installing VirtualBox 6.0
How to install virtual box on ubuntu 19.x
$ sudo apt-get install gdebi

Then Download file from https://www.virtualbox.org/wiki/Linux_Downloads

$ sudo gebi PATH_TO_YOUR_LOCAL_.DEB_FILE

In my case I had to run sudo gdebi virtualbox-6.1_6.1.0-135406~Ubuntu~eoan_amd64.deb
Links
https://computingforgeeks.com/how-to-install-vnc-server-on-ubuntu-18-04-lts/
https://askubuntu.com/a/475036
Other issues:
- Unable to open firefox as root? Check https://askubuntu.com/questions/1037052/running-firefox-as-root-in-a-regular-users-session-is-not-supported-xauthori
- Install Virtual